


Voyage of Wonders:
Voyage of Wonders is one of AFK Arena’s most intriguing events. Voyage of Wonders breathes new life into the game by giving players a lot of fun, challenging puzzles, and a lot of money-making opportunities as they explore different areas.
When participating in activities, many game lovers like to design hard enamel pins for
their team. The pins can easily be attached to the lapels, giving players a sense of
belonging to the group. As an event organizer, customized pins are also good event gifts
because pins are not only popular giveaways, but they can also be used to promote the
event after the logo and other information are added.

NOTES:
- Each adventure is 14 days long.
- Everyone receives the same prizes.
- At the beginning of the event, enemies will scale their attacks depending on your own hero levels.
- There won’t be any more difficult enemies to fight after the event starts, so you can get stronger over the next 14 days and keep going.
- Like in Peaks of Time, you can restart the adventure as many times as you wish.
Rules:
- As long as the event is going on, you can go around the world and get a lot of different things and rewards.
- The health and energy levels of heroes and opponents will not be reset once combat is completed.
- The invading side’s heroes will be wiped out if the fight timer runs out.
- Players can restart the adventure at any point, and all heroes and villains will be restored to their previous state. Carry on until you’ve figured out how to defeat the event.
- The strength of antagonists is determined by the strength of each player. Once the event has started, the strength level of enemies will not alter. Even the most powerful players in the AFK Arena won’t be able to finish this event.
- Only one reward can be obtained per event.
Fun fact: the current location of Voyage of Wonders was once occupied by the Dura’s Trial building. It was taken down just before the global launch of AFK Arena.
All Maps from the Voyage of Wonders
The Arid Lands
From February 23, 2022, to March 9, 2022, The Arid Lands is a limited-time Voyage of Wonders stage. Players must provide water to all of the supply stations in order to gather the treasures spread throughout the area.

- Water should be delivered to all stations.
- After each successful delivery, you will receive a small chest.
- If you skip any station, you can still receive the ultimate chest. You will not, however, receive all of the little chests.
The Sunken City
The Sunken City’s puzzle aspect isn’t the most difficult we’ve seen in Voyage of Wonders, but it’s also not the kind of world you can just walk through; you’ll need to plan out how you’ll flood the compartments ahead of time.

- To fill the pool and raise the floating items, turn on the water outlet pump.
- To transfer water from one pool to another, use the water transfer pump.
CW stands for clockwise.
ACW stands for Anti-Clockwise.
Voyage of Wonders: Tundra Trouble
There are color-changing laser beams, a balloon that can be used to propel you around, and portals that can only be used in one direction. That’s all there is to it, and I haven’t been disappointed with this one because I appreciate the riddles in Voyage of Wonders.

- Fire a laser at it to change the color of the gate.
- The Fire Daemon is summoned by the Orange Gate to clear the trees.
- The Freeze demon is summoned by Yellow Gate in order to freeze the water.
- #44 will offer you a balloon that you can use to fly over the map.
- #45 provides information about the final chest.
- At step 46, you’ll find the Final/Hidden Chest.
The Foreboding Disaster
From January 10, 2022, to January 24, 2022, the Foreboding Disaster is a limited-time A Flame Reborn Voyage of Wonders stage. Players must retrieve the displaced six feathers to restore balance and unthaw the frozen woodland in order to collect the treasures distributed throughout the stage.

- On January 9th, it will be available.
- You can use any weak hero in Step 2 because you have to lose.
- To dispel the fog and open a teleport to Talene, collect the feathers.
- Before grabbing the last treasure, collect all the little chests (save those blocked by Permafrost), as defeating the final boss will clear the entire area.
- After step 22, the tiny chest at 9 o’clock (protected by the red laser) will be available.
Land of Frozen Lakes
Because the previous worlds focused more on story-telling, the Land of the Frozen Lakes returns with more puzzle elements and some interesting things to consider as you progress through it.

- You’ll slide right across the ice tile if you step on it.
- If you attack Estrilda and Cecilia’s team, you will be arrested! (apart from step 13).
The Icy Garden
The goal of the Icy Garden is to navigate the map by using one-way pathways to move from one location to the next. Every one-way track has a lever that will reverse the direction, so you may return, but if you go madly through the Icy Garden, things might become nasty.

- To get to the other side, take the one-way track.
- To change the direction of the slide, pull the lever.
- Finally, take the large chest. Otherwise, you won’t be able to return.
The Road Home
When it comes to incentives, and it appears that Lilith has recently resumed dishing out greater awards, well, with The Road Home, we take a step backwards. The major prize is a 10x Faction Scroll, which I personally dislike and will frequently only reward with fodder.

- To repair the railroad and return the residents to their old hometown, they must locate the lost track.
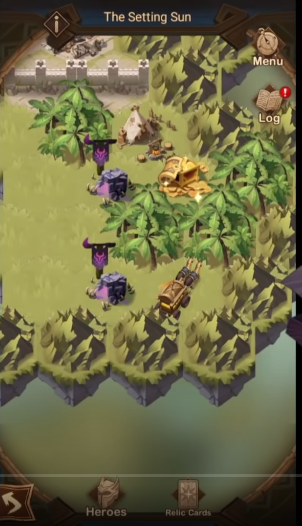
The Setting Sun
The Setting Sun is more of a story-driven than a puzzle-driven Voyage of Wonders environment, and I don’t want to give anything away about it just now. The majority of your time will be spent walking around the globe, talking to different individuals to progress the tale, and solving tiny puzzles involving levers here and there.
The Forgotten Frontier
As previously said, The Forgotten Frontier is situated in a graveyard, and you must use laser beams to illuminate various regions of the map in order to construct your path across the realm. That’s pretty much it; the puzzle isn’t overly difficult, and you won’t get stuck.

- Connect the beacon to the crystals through the red and blue lines to turn it on.
- To modify the hue of the light, use the orb. The blue-and-red line and the blue-and-red light must be connected.
- CW stands for clockwise rotation.
- ACW (Anti-Clockwise Turn)
Demonic Incursions
Although previous Voyages of Wonders had better stories and puzzles, I still enjoyed this one, despite the fact that the previous ones had set the bar quite high. The fact that the main prize for Demonic Incursions is 10x Faction Summon Scrolls is a major letdown.

The Gold Rush
The plot revolves around Rowan being robbed by a criminal that looks like Wrizz. Because the thief will always take the most direct route to the next gold, you must strategically interrupt him and strike him with fire balls to steal the golden chests until you obtain the final crystal chest. I had a great day and had a lot of fun with Gold Rush.

- After being hit by the cannons, Wrizz will move on to the next chest.
- Set up the phoney treasure to entice Wrizz to location #8, then kill it with the cannon (#10).
Lost in the Wild
In Lost in the Wild, you must travel over many islands and find trigger stones in the earth. You must step on those stones while walking through the realm, clearing the camps, chests, and relics, and each time you do, one line on the map vanishes. So it’s up to you to accomplish it in the correct order to avoid any awards or other important parts “disappearing” before completing Lost in the Wild.

- The lowest grid row will be eliminated each time you step on t
- he button.
- The final boss is a piece of cake. Although you do not have to acquire all the relics in order to destroy them, I have included those procedures in case you want to strengthen your squad.
The Sealing Sword
The storyline of The Sealing Sword is somewhat straight, with few opportunities to look left and right, yet it is enjoyable. It’s not overpowering, and we’ve had better, but I was having a good time in the realm. All you have to do is journey from narrative point to storey point, clearing the map along the way.

It’s worth noting that the boss at #9 is unbeatable. You can attack it with whichever squad you like. At stage 10, all of the defeated heroes will be resurrected.
The Final Night
You must find the imposter among the other individuals by uncovering evidence and piecing together their backstories. There are other riddles in between, but they aren’t that difficult; they mostly involve changing railroad configurations.
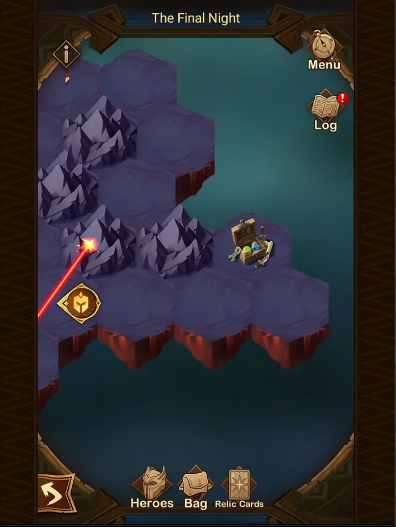
The Island of Solitude event includes this Voyage of Wonders map.
To obtain the goodies, players must first solve various puzzles. Simply follow our easy-to-follow guidance map below to finish it quickly!
Forgotten Ruins
Lasers, rails, many layers of flooring, levers, etc. This one has it all, and it appears daunting when you first start it. The puzzle isn’t the most difficult, but it’s also not one that you can just walk through like the others.

- Use the light beam to illuminate the structures and descend the platforms.
- The last boss is a formidable foe. With the usual Ainz team, I was able to defeat it.
- You won’t have to redo the map if you make some bad decisions.
Ancient Seal
The Ancient Seal’s rewards are largely the same as last time, with 10x Stargazing Cards serving as the main prize in the final Crystal Chest. Boosters, emblems (including a 10x Faction Emblem Choice Chest), and furniture coins are all found in the Golden Chests.
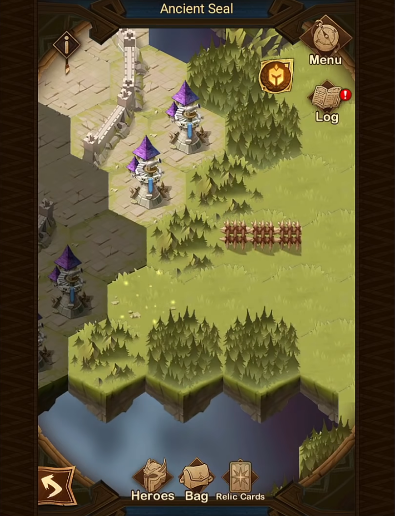
- Collect the three required stones at # 20, # 26, and # 29 to open gate # 31.
- At #9, choose the appropriate relics for your team configurations.
Ice Isles
To acquire the final reward, you must lure two elementals across the map and lead them to the final place. The intriguing thing is that you have to use the runes to entice them to a variety of levers (I don’t recall seeing that many colours for levers before) in order to open the appropriate way for them.

- On June 20th, it will be available.
- You can’t go back once you’ve gone to the next island, so destroy all of the camps as soon as possible to collect the rewards!
- The Fire Monster must be protected against the Ice Monster.
- Take the Fire Monster to the 37th and last island.
- You must restart the map if the Fire Monster dies.
Void Rift
The Void Rift map is quite simple to navigate; you must fight your way through various enemy camp lines. After completing the first section, you will receive Morael as a mercenary hero, as well as a debuff relic that will reduce the damage dealt by all of your heroes by 90%, with the exception of Morael.

- After completing step 1, add Morael to your team to make defeating the enemy much easier.
- I’m a little down today because I have nothing to do.
Price of Rebirth
The main goal is to create paths through the map of The Price of Rebirth, which requires the use of a tornado. The intriguing thing is that the tornado will remove anything in its path, so you must carefully plan its path or you risk losing awards or other valuable stuff.

- After teleporting to the new island, you are unable to return.
- You must redo the map if you make a mistake with the tornado.
The Hunting Trail
The Hunting Trail’s prizes aren’t spectacular, but they’re a step up from the previous Voyage of Wonders realm, with the major prizes being 10x Regular Summon Scrolls and 10x Stargazing Cards, as well as the usual purple and yellow emblems and boosters.
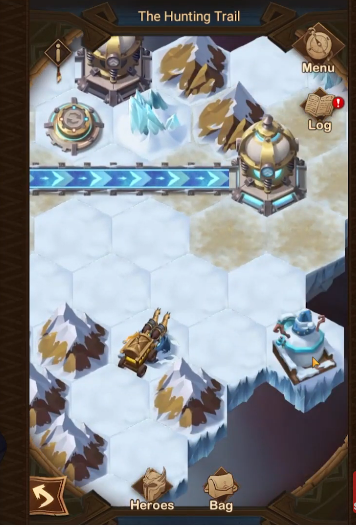
- To retrieve the last chest, you must restart the map if you trigger step 18.
- The final boss is a piece of cake. Before you battle it, collect all of the artifacts.
The Hunting Trail

- To retrieve the last chest, you must restart the map if you trigger step 18.
- The final boss is a piece of cake. Before you battle it, collect all of the artifacts.
A Guide to the Art of Conquest
The Art of Conquest is more about tactical relic gathering than it is about puzzles. You have some boss camps that will reset all of the relics you’ve acquired, so plan them carefully or you’ll have to face a boss fight that’s too difficult and you’ll have to start again. That’s pretty much it for this domain.

- Choose the best relics to make it simpler to battle the mini and final bosses.
- Your relics will be removed each time you defeat the mini-boss.
- Before fighting the final boss, you must defeat three mini-bosses.
- When fighting normal battles, avoid using Ultimate and save your energy for the bosses!
Roamers’ Rhapsody Guide
It’s not difficult to beat Roamer’s Rhapsody. The problems are reasonable, and the relics you receive are extremely powerful, so you should have no trouble defeating the camps.
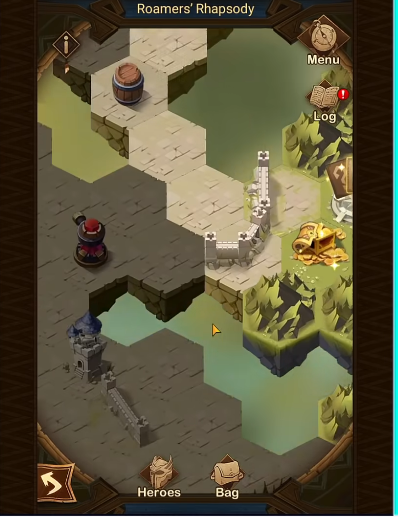
- There is no hero available at the start of the journey.
- To make heroes from the Wilder Lightbearers, Maulers, and Graveborns available, go to each faction camp.
- There are no Dimensional/Hypogean/Celestial Heroes on this map.
- Because Wilderness is the first faction to unlock, if your Wilder team is insufficient, hire three Wilder heroes from your buddies!
- Players can challenge the last boss at #41, after unlocking heroes.
- You will not have any problems with enemy camps or bosses.
The Depths of Time III
The Depths of Time III is the next realm in the Voyage of Wonders series. We all know how popular the previous chapters were, and this time there will be a new chapter in the storey that will allow you to move back and forth between the past and the present.

- To earn all of the awards, you must run the map four times.
- The plot is quite intriguing. There are four distinct endings to choose from. To alter the future, change the past!
- You’ll have to redo the map if you make a few mistakes.
- The final enemy boss is a piece of cake. If you desire, you can collect all of the relics before defeating them.
The Fractured Gallery
This is a realm with various unique aspects that we haven’t seen in any prior Voyage, and you’ll need to run through The Factured Gallery three times to obtain all of the awards.

Blighted Highlands
The Blighted Highlands, the next kingdom in the Voyage of Wonders, is on its way. It’s a winter-themed environment in which you must navigate an ice elemental throughout the map in order to destroy it.

Fields of Ice
The Fields of Ice, the next region in the Voyage of Wonders, are on their way. I liked the last Voyage of Wonders, and this one is similar, with new puzzle components like the Steam Cann.

Dreamscape
The Dreamscapes, the next region in the Voyage of Wonders, are on their way. This realm was a lot of fun to play, and the way the problem was presented in this Voyage of Wonders really caught my attention. I’m sure you’ll enjoy it as well. It’s challenging but not taxing like the other kingdoms we’ve had.

To play the game, download it here
Previous Maps( Voyage of Wonders )
Tempestuous Twisters
The Tempestuous Twisters, the next region in the Voyage of Wonders, is on its way. This time, the puzzle part isn’t as difficult, and I’d say this is one of the simpler kingdoms in the Voyage of Wonders this year.

Bridge of Souls
The Bridge of Souls, the next realm in the Voyage of Wonders, is approaching. When it comes to length and difficulty, I really liked this one because it had it all: a nice puzzle, excellent rewards, and plenty of camps to fight in.

The Arid Badlands
Arid Badlands is a one-of-a-kind AFK Arena event that places players on a brand-new map filled with challenging riddles and precious prizes. The map features a railroad maze as well as a few various coloured minecarts that must be directed to their final destinations.

The Snowy Front
To open the map, players must go to Chapters 31–60. To play this map, you must accomplish at least 60 percent of the “Tempestuous Twisters.”

Deathly Marshlands
There was a hero choice chest and some soulstones while the Deathly Marshlands were up in Voyage of Wonders, but the rewards have changed now that it’s within Wandering Balloon:

The Realm of Denial
To unlock the final path leading to the final crystal chest, you must guide a ghost through various stations to his “home.” Along the route, you must ensure that the ghost remains in the appropriate locations to assist you in clearing the path.

Cinder Grottoes
You have a lot of portals, and they all lead to the portal stone, which requires you to flip around the map to get to the next area. There are different levels within the sections, and you must block the path correctly to get the portal stone to the correct position before moving on to the next portal.

The Dusty Barrens
To claim the Crystal Chests, you must send two barrens, one blue and one red, through the map. To get the main reward, you don’t even have to fight any enemy camps; that’s just for the bonus Golden Chests.

Mirael’s Nightmare
The 17th adventure in the Wandering Balloon is Mirael’s Nightmare. Peaks of Time is where you’ll find it.
Requirements
- Finish Chapters 28 through 20
- In the Wandering Balloon, complete 60 percent of “The Sandy Tracks.”

The Sandy Tracks
The main goal of Sandy Tracks is to guide a cart through several stations on the map until it reaches the final point, which will reveal the only Crystal Chest. On the railways, you must discover the correct path and block the incorrect ones. However, this is merely a cosmetic task.

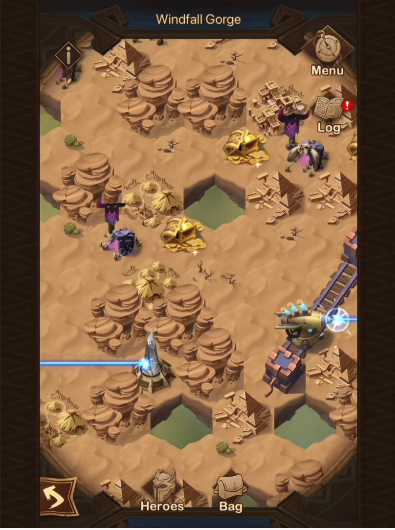
Windfall Gorge
In the Windfall Gorge, the main goal is to use the lasers to activate the portal that leads to the last part. It’s actually quite simple, and there’s no way to get stuck.
The key is to use the orbs correctly to transform the red lasers into blue lasers in order to unlock the portal.
.
Track of The Sands
The main objective in Track of the Sands is to move a supply cart through two portal steps to the end position. When you manage to get the cart to the end portal, it will give you the main Crytal Chest reward for the realm. On the way, you have to unblock the path of the cart and defeat some camps. That’s it.

The Echoing Valley
The Echoing Valley’s main goal is to smash massive stone balls through the terrain with the help of various battering rams in order to open up all sections and reach the final boss fight. There isn’t anything else to do.

The Depths of Time 2
With The Depths of Time 2, our realm has a new chapter, and I can assure you that it will be an exciting one!

- Next to step 6, do not accept the gift. It will obstruct one large chest.
- The right-hand cannons are inoperable. You must refuel them by firing from the left guns.
The Hazy Timberland
The major goal in The Hazy Timberland is to unlock each segment of the map in the correct sequence in order to stay up with the increasingly powerful enemy camps in each area (unlocking them in the wrong order can lead to camps that require more relics). Unless you keep getting particularly poor relics, the last boss fight will not be an issue.

The Frozen Hinterland
The main goal of The Frozen Hinterland is to clear your passage through the lasers in order to obtain the hidden weapon that will aid you in defeating the final boss.

Also read this: The Frozen Hinterland Guide: AFK Arena (Wandering Balloon)
The Howling Wastes
The main goal of The Howling Wastes is to solve all of the puzzles in order to reach the final boss fight. The fights themselves aren’t difficult, and if you know how to handle the puzzles, you’ll have no trouble.

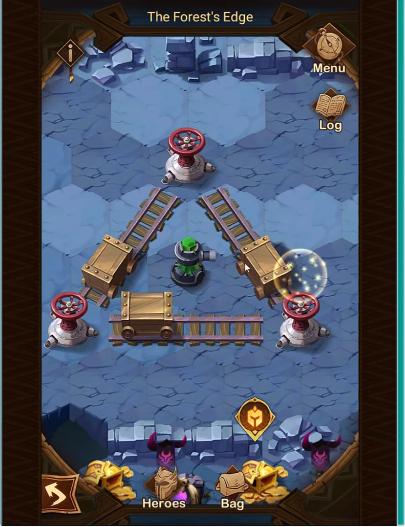
The Forest’s Edge
The main goal of The Forest’s Edge is to solve the puzzles in order to reach the final boss fight. The fights themselves aren’t difficult, and if you know how to handle the puzzles, you’ll have no trouble.
Trembling Highlands
The Trembling Highlands, a new region in Voyage of Wonders, have arrived.
This time it gets interesting because we won’t be working on a level surface; instead, we’ll be working on varied elevations that will make the puzzles a little more difficult.

Frozen Ground
You’ll basically lure an ice demon around the realm map in such a way that he’ll freeze the lakes that stand in your way by lighting fires in the proper order. Although it is technically impossible to become stuck, some aspects do necessitate some creative thinking.
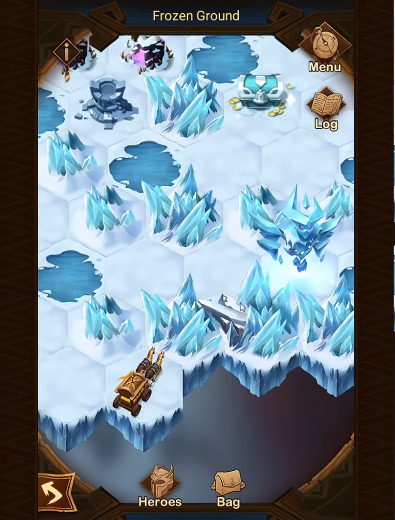
Fire is what draws the Ice Monster in. Your objective is to use the frozen torch to push the Ice Monster to move, therefore freezing the water tiles and eventually capturing it.
The Frozen Pass
It’s only a matter of launching some obstacles and guiding them to the appropriate locations. That’s all there is to it. There’s no way to get trapped in such a way that you have to restart the game.

Note: Remember to include Vurk in your team if you want to beat # 28 and find the hidden path!
The Frosted Expanse Map
In The Frosted Expanse, the puzzle component is not difficult; you will essentially exhibit snowballs that either clear flames that will block your way or permanently trigger levers.

Fields of Stone Map
In the Voyage of Wonders, the Fields of Stone were a limited-time experience. It has since been added to the Wandering Balloon as a permanent adventure. The Peaks of Time building is where you’ll find it.

This map is simple to understand. To open the routes, move the laser around.
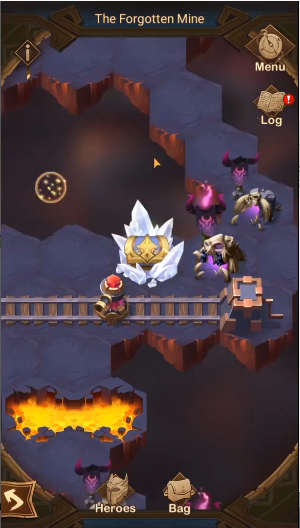
The Forgotten Mine Map
All of the encounters against Nara teams are the most difficult aspects of this map. Just don’t battle them since you’ll never be able to beat them.
Instead, use the Magic Turret to easily eliminate them.
More guides about AFK Arena: