


The Apple Pencil is arguably the greatest iPad accessory available, even though it doesn’t ship with any iPad devices. With its user-friendly interface and robust writing and drawing capabilities, this tool makes taking notes, sketching ideas, annotating documents, and more a breeze. You may not be aware of all the things you can do with it, but there are a lot.
Depending on the Apple Pencil model you own, there are differences in what you can accomplish with it on your iPad. The initial version was released in 2015 along with iOS 9.1 and the original iPad Pro, and it required charging through the iPad’s Lightning connector. Its form is rounded, and the Lightning connector is covered by a cap at the end.
The arrival of the third-generation iPad Pro along with an upgraded Apple Pencil in 2018. It is magnetically attached to the side of any iPad with a USB-C connection and charges wirelessly. A touch-sensitive button that may execute shortcuts to expedite your productivity is another feature of its one-piece construction.
Some apple pencil tips are as follows:
Tip 1: Enter Text by Handwriting
With iPadOS, you may utilize handwriting recognition technology with the Apple Pencil’s Scribble function to input text into any text field on your iPad without opening the on-screen keyboard. Hence, you can write on your iPad by hand using your Apple Pencil, and it will immediately translate to appear as though it was typed.
Everything you write with your Apple Pencil stays private because all text transformations happen on your iPad. It can read handwriting in the following languages: Portuguese, Cantonese, Chinese, English, German, Italian, Japanese, and Spanish.
See if you can use it for Safari searches, note-taking, message replying, email drafting, and other tasks. You can handwrite with Scribble everywhere you can enter text. To begin handwriting, simply place your cursor over the text area; the tool will detect your handwriting and proceed accordingly. You can even write with the Apple Pencil outside of the text area as long as you don’t pause while handwriting.
The “Scribble” switch should be turned on by default. If not, go to Settings –> Apple Pencil and check whether it’s not working.
Tip 2: Select and Edit Converted Text
While transferring handwriting to typed text with Scribble and your Apple Pencil, mistakes are inevitable. However, there are a few simple tips to help you correct handwriting mistakes. Try the following ones by going to Settings –> Apple Pencil –> “Try Scribble.”

Selecting Out Text:
- A word, number, phrase, sentence, paragraph, or whole page can be chosen by drawing a circle around it.
- Click and drag a line to select a word, number, phrase, sentence, paragraph, or whole page.
- Select a word, number, phrase, or line by underlining it.
- Press a word or number twice to make it active.
- To choose more text, double-tap, hold, and drag in any direction over a word or number.
- To choose a word or number’s complete paragraph, triple-tap it.
- Drag the ends of the text you’ve selected to adjust the selection.
- Erase a word, number, phrase, sentence, paragraph, or whole page by scratching it out either vertically or horizontally.
- Write what you need to in the empty space before it vanishes by tapping and holding a text area to add more content.
- Press on a text field to move the pointer there and type the necessary content.
- To bring characters together or apart, draw a vertical line between them.
Also Read: https://thegamedial.com/apple-pencil-1st-gen/
Tip 3: Make Use of the Double-Tap Method
On the flat side, close to the tip, of the second-generation Apple Pencil is a concealed “button” that you may double-tap to activate a certain function. You can select any of the following under the Double Tap header by going to Settings –> Apple Pencil. By default, the double-tap shortcut will switch between the current tool and the eraser.
- Toggle Between the Current Tool and the Eraser
- Turn Between the Tool You’re Using Now and the One You Was Using Earlier
- Exhibit a Color Scheme
- Only apps that are supported can use the double-tap shortcut. It’s a great tool for Notes, but you can use it anyplace you sketch or use markup, such as in Mail, Photos, Files, and so on. Procreate is only one of the many third-party apps that support it.
Tip 4: Use the Corner Swipe Gestures
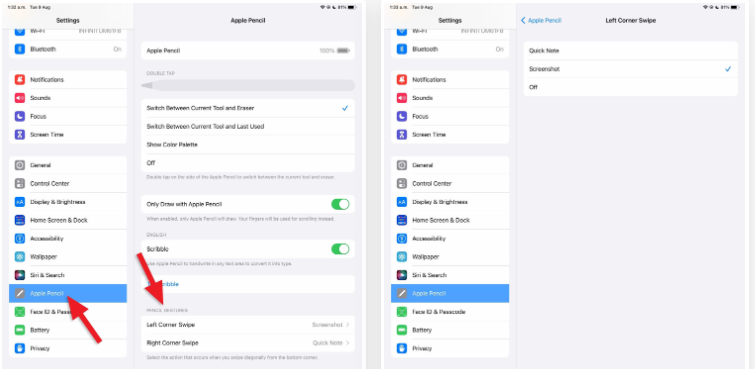
To execute a particular action on your iPad, you can swipe diagonally from the bottom left or right corner of the screen using your Apple Pencil. When you swipe in from the bottom left, a screenshot is automatically taken, and when you swipe in from the bottom right, a Quick Note is opened.
Under the Pencil Gestures header, select a different action for the “Left Corner Swipe” or “Right Corner Swipe” after going to Settings –> Apple Pencil.
However, the only actions that are accessible are “Screenshot” and “Quick Note,” so your options are limited to either making either trigger do the same thing or swapping the actions. If you find that you are inadvertently triggering the triggers more often than you would want, you have the option to completely disable them.
Tip 5: Configure the Quick Note Gesture
You can adjust the Quick Note corner-swipe motion via Settings –> Notes if you like it but don’t like that it will continue the previous note instead of creating a new one. The “Resume Last Quick Note” switch can be turned on or off under the Quick Notes section.
Additionally, similar to the option in Settings –> Apple Pencil, you may switch between Screenshot, Quick Note, and Off actions by opening the “Corner Gestures” menu here. The “Allow Finger to Swipe From Corner” setting is the only additional feature that makes a difference. It should be enabled by default, but you may turn it off if you wish to limit its use to the Apple Pencil only.
Tip 6: Auto-Convert Handwriting in Notes to Text
When you write a note in the Notes app, the drawing interface opens instead of the usual Scribble tool. It might not automatically transform to typed text if you start handwriting immediately away. This is because you have to make sure that when choosing a pen from the Markup tools, it’s the right one.
To access the Markup toolbar, select the Markup icon located at the top of the note. Ensure that the pen bearing the letter “A” is picked when it opens. Whatever you write in the sketch or drawing will then be typed.
Also Read: https://thegamedial.com/how-to-charge-apple-pencil/
Tip 7: Convert Already Handwritten Notes to Text

- You can edit those old handwritten notes after the fact if you have a ton of them in the Notes app and didn’t know you could have your Apple Pencil automatically translate handwriting to typed text. The word, sentence, or paragraph you wish to convert should be chosen first. To achieve this, first, ensure that the Markup toolbar is closed, and then:
- Press and hold a word or number twice to make it selected. If necessary, you can extend the selection by dragging the selector ends.
- Using your finger, long-press a word or number to pick it. If necessary, drag the selector ends to enlarge the selection.
- To choose different text on the screen, double-tap, hold, and drag a word or number on the screen. You can now skip words in a line, sentence, or paragraph by doing this.
- To pick the entire line, triple-tap any word or number.
- To pick the entire paragraph, quadruple-tap a word or number.
- If necessary, you can adjust the selection by dragging the ends of the selected text.
- Press the selection to bring up the contextual menu if it doesn’t display immediately. Then, pick “Copy as Text,” to copy all of the handwritten text to your clipboard as typed text. When you finally paste it in the desired location, the typed text will appear.